Music Monster

Credit:

Lori Lemon, MT-BC  (lorilemon@hotmail.com) and myself

Inspired by a video on youtube involving a jukebox

Objectives

-Making choices

-Counting

-Math skills

-Money skills

Materials Needed

*NOTE: this would be better with a minimum of two people – two therapist, assistance from the teacher or an aid, etc.

-A table or desk large enough to fit a person under

-A sheets to cover the table

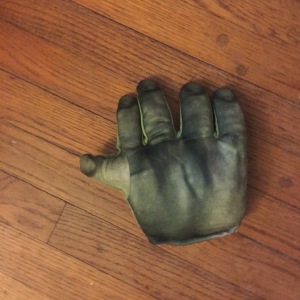
-A “monster hand” (We used a Halloween costume hand of a Teenage Mutant Ninja Turtle)

-A device to play songs on such as an iPad, iPhone, MP3 player with speakers, Computer, etc.

-A playlist sheet with prices

-Fake money

-Sign for “Music Monster Mansion” (optional)

Procedure

Place the sheet over the table/desk so that the person underneath is completely hidden. Whoever is playing the music monster will hide under the table with the device to play the songs and the monster hand. The other person will instruct the clients that in order to get a song of their choice played, they will need to count out the exact price of that song. The “music monster” can simply stick the monster hand out at the bottom of the sheet. To make this task harder, the person playing the music monster can alter the price (i.e. “Oh that song is on sale for $x.xx off!” “I’m running a special on buying two songs for….”). To make the task simpler, simply use fake dimes or pennies to make it more of a counting task. Once the right price is received the “music monster” can play a clip of the requested song.

By using two people, the person not playing the music monster can grab the money used and return it to the clients when they have run out of money. That person can also keep an eye out on the clients since it’s a little hard to do so while hiding under a sheet.

Visual Aid

monsterhand

Side notes

-This is an excellent intervention for Halloween.

-My cat, Kitty, continues to steal this monster hand from my visual aid bin. I usually find it in a different room from the bin.

Colorado/Transportation Song

Credit

David and Nikki Belshe, MT-BC, Heart and Harmony Music Therapy

Objectives

-Pronouncing Consonants

-Matching sounds to vehicals

-Fine Motor Skills

Procedure

The folder can serve multiple purposes. I’ve used it by simply having a client choose the vehicle and singing about that. On the other side of the folder, you can place the sounds for the vehicles. Finally on the back, you can designate two squares (for just vehicles or both vehicles and sounds) to place them.

Vehicles:Sounds

-Helicopter = BBBBBBBBBB

-Train = Choo Choo

-Boat = Tug Tug

-Car = Vroom Vroom

-Plane = Fly

-Bus = Beep Beep

-Horse = Giddy Up

Adaptation

Some sounds can be combined, such as Car/Bus = Beep Beep, Horse = Neigh, and Helicopter/Plane = Fly depending on the client’s needs.

Visual Aids

This visual aid I got from my supervisors. It’s simply a side for the vehicles, a side for the sounds, and the back for the two squares. Words are optional.

IMG_0794colorado back

Unfortunately I have no printables.

Song

(I)”If I had a ___(vehicle)____, I would __(sound)____ to Colorado, (V) __(sound)_____ to Colorado, (I) If I had a _(vehicle)____.

Oh if I had a ___(vehicle)____, I would _____(sound)____ the state, where a man can walk a (V) mile (I) high!”

Recording coming soon!

Color Bunnies

Credits

– Amber Mathison (http://fromabcstoacts.com/pin-the-tail-on-the-bunny/)


Objectives

Matching Colors

Procedures

Sing the song and allow the client to match the correct color to the right bunny.

(To the tune of “Here Comes Peter Cotton Tail”)

Here Comes Peter Cotton Tail

Hopping Down the Bunny Trail

Hippity, Hoppity, He’s on His Way

Help the _________ Bunny Find His Tail

You Helped the ______Bunny  Find His Tail

Hippity Hoppity You Helped Him Find His Tail.

Example

color bunnies

Visual Aid

To make this, simply print out the bunnies found on the website mentioned at the beginning of this post. Cut them out and glue them to a folder. Laminate the folder and add the velcro (a strip for the tails and places to put the tails on each bunnny). Hot glue velcro to pom-poms (otherwise they will detatch). I got the pom-poms at the Dollar Tree for a dollar! What a savings!

Stories with Emotions

Credit

Kate Williams

Previous Heart and Harmony Music Therapy Intern


Objectives

  • Identifying emotions in a story

Materials Needed

  • Social Story
  • Recorded sound clips representing emotions

Procedure

Review the sound clips before reading the story. Instruct the client to read the social story. During each action or event in the story, ask the client how the person in the story feels. If correct, play the sound. If there is uncertainty or the client is incorrect, play the sound to prompt the client. Continue until the end of the story.

Example

Chad and Zeke

Sound Clip Examples

Angry

Anxious

Excited

Happy

Peaceful

Sad

Scared

Credit: Kate Williams

“LDT”

Credit

David Belshe, MT-BC, NMT

Heart and Harmony Music Therapy


Objectives

  • Sustained Attention
  • Motor skills

Materials Needed

  • Drum (with or without mallets)
  • Stopwatch – I use the one on my iPhone
  • Instrument for the client

Procedure

Get yourself set up. My set up came from my former supervisor, David. I place my right leg over my left. My drum is supported by both legs and my phone ( I use it for a stopwatch) is placed on my right foot. This placement makes being able to stop and start the stop watch quite easy. Then give the client an instrument to play/shake and time the amount that they play.

*LDT – Leg-drum-thing; The other intern with me during my internship and I used that term when talking about it.

Foot drum thing

Dance Board

Credit: Kate Williams

Previous Heart and Harmony Music Therapy Intern


Objectives

  • Gross Motor
  • Coordination
  • Executive Functioning (planning and decision making)
  • Memory (with removal of the dance move visuals)

Materials

  • Foam Board with velcro
  • Dance Move Visuals
  • Labels (i.e. 1st Verse, 2nd Verse, Chorus, etc.)
  • Recorded Music

Procedure Allow the client to choose the dance moves for each part of the song (verses, chorus, bridge, etc.). Review the moves physically before beginning the song to allow for either learning or practicing. When the music is played, model for the client.

Adaptations

  • This can be made more difficult by using separate upper (hands) and lower body (legs) moves and pairing combinations of this.
  • When working with a group, turn taking can be addressed when deciding on dance moves. Also you can incorporate moves that require more than two people, such as a conga line.

Making the Visual Aid Kate took a foam board and simply attached 3 rows of 4 Velcro squares evenly. The top serves to be used as the labels for the parts of the song. The second can be used for simple moves or upper body moves while the bottom is used for lower body moves. The dance moves are simple stick figure representations of the moves with their names. Dance Board Whole Dance Moves

Song Books

While these are not the books I’ve seen at Patina’s presentation at conferences, I did not have a clue that books such as these existed until then. I have either received these as gifts or bought them at the local recycled book store in town. They make for an easy premade visual aid.

songbooks

Five Little Fishies

Credit

Song and movements credit: Jamie and Kelly – https://www.youtube.com/watch?v=Ijnkn–2Sos


Possible Objectives

  • Counting to 5
  • Fine Motor (with visual)
  • Gross Motor (with movements)

Materials needed

  • Visual aid – optional

Procedure

If using movements with no visual aid, teach the movements first. If not, allow the client(s) to move the fish to the shark. In between count the number of fish remaining.

Visual Aid

This is a folder visual aid. I used a blue folder to make it easier on me, however you can play around with the background and use any folder. Simply print out the fish and shark and cut them out. Glue the shark to the folder and laminate it as is. Laminate each fish and apply Velcro to the fish and folder.

5 Little Fishies

5 Little Fishies

Song Ring

Need to think on your feet about what song to use next? Can’t remember which songs you have either memorized, in your songbook, or both? That was me. Fortunately, I was introduced to the concept of cards with song titles on them, which allowed me not to get lost in a giant list of song titles. I took it a step further and added a binder clip so that I can easily flip through and store them. It’s like the Urbanspoon of songs. If you need a simple reminder of chords/lyrics/capo, etc., they can be easily added to the back. You can even color code if necessary (i.e. hymns/church, folk, pop, country) for various genres.

Steps

  1. Using index cards, either simply write the name of the song or the name of the song with some form of clip art/visual aid so that clients who are unable to read can recognize the song.
  2. Laminate, this step will help keep the cards from becoming destroyed – even when thrown in the bottom of a bag full of items.
  3. Hole Punch
  4. Add a binder ring

Song Ring